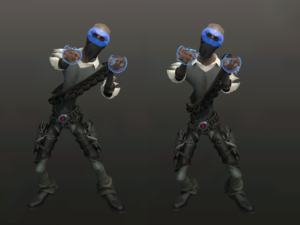
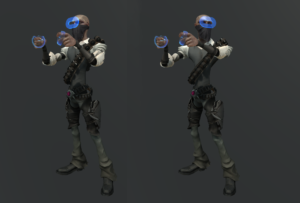
Inverse Kinematics in Dead and Buried
Introduction
The dawn of VR introduces many new challenges for game design and programming, among them the problem of inverse kinematics (IK). It translates into two basic questions – how do we see ourselves in VR experiences and how do others see us? The first question has been usually answered with simply hiding the body from view. The second question has hardly been asked at all, since there are not many multiplayer VR experiences involving humanoid avatars out there yet.
We could be fully content with seeing only our friend’s heads floating around or seeing them as funny little animals if it wasn’t for the the addition of hand controllers to the hardware available to us. The hand controllers mold the “little annoying IK problem” into an essential question whether a game can be made or not. The task for IK here is to bring down the level of abstraction as close to reality as possible, maintaining the suspension of disbelief, immersion and sense of presence.
Dead and Buried is a multiplayer first-person VR cover shooter for the Oculus Rift + Touch and a perfect test subject for this kind of research. The game’s design required us to solve these inverse kinematics problems and the following paper briefly guides you through some of the main challenges dealt with in the process.
Analysis
The incoming data from the Oculus Rift and the two Touch controllers consists of a position (3D vector) and a rotation (Quaternion) for each device. Needless to say, it is very little information about the full body pose of the person occupying the controllers and in most cases there are multiple valid solutions for any given data set.
The absence of obvious analytical solutions in such cases yields to some empiricism to be employed in solving the task. The farther we look from the body parts attached to the controllers, the greater the probability of miscalculation and the risk of breaking the immersion. We are forced to make an educated guess, so we need that guess to be as intelligent as possible. The best source of knowledge and inspiration here comes from observing people actually play the game.
Identifying the challenge, we arrive to these main problems:
- Finding the most relaxed pose – based on observation, avoiding extreme angles and singularity points while maintaining the ability to cover most of the vast range of human motion. In multiplayer games it is also important to be able to convey hand/head gestures in a natural-looking way.
- Achieving the look and feel of the style of motion – in some cases it is important instead to preserve the look and feel of motion suitable for the theme of the game and the characters even when the real pose of the player does not comply with it.
- Locomotion – with no information about the lower body pose, how do we know where to place the feet? We have to choose between an animated, procedural or some kind of a hybrid solution for locomotion.
- Maintaining balance – With the head and hands locked to the controllers, it is important to place the feet and bend the spine so that the final pose would appear adequately balanced.
- Supporting different body proportions – real people and virtual characters alike come in all shapes and sizes. How do we manage to reach when our virtual hands are smaller than our own?
- Protecting from invalid input – sometimes the controllers get obscured or the player puts one of them down and moves away. How to prevent the avatar from twisting up in weird poses?
The Solver
Currently there are not many (if any) full body IK solutions available that would meet the very specific requirements of VR content development. Besides the accuracy and overall quality of the solver, it is also vital for the solver to be highly efficient and performant as VR is already a relatively big burden on the CPU. In addition to that, every avatar in a multiplayer game will depend heavily on full body IK, not just use it for small cosmetic adjustments, so there will be very little to optimize for the avatars out in the distance. Therefore, VR requires IK to be solved not only in high frequency, but also in high quality – everything becomes observable in close detail and in first person view it even needs to live up to the comparison of reality, the player’s real flesh and bones.
Considering all that, we decided to start creating a new solver (VRIK), one fully dedicated to the three controller problem, a hybrid solver combining analytic and heuristic algorithms, employing each for their specific qualities. The solver will compose the final pose solving each body part sequentially, a solution allowing full control in and between each step and iteration.
The following paragraphs will describe the solving process in a bit more detail.
Step 1 – Spine
As noted earlier, the solver will deal with each body part one by one. Since the position of the head is our primary concern, the solver will hold the positional/rotational input from the HMD as it’s primary goal (HMD tracking is also more reliable and least likely to get occluded). It first needs to determine the bend and twist angles for the spine and the neck. Observing natural human motion provides with an understanding of how much people normally bend their spine when looking up or down, left or right or tilting their head.
It is not only the rotation of the HMD though, that provides important input here, the positions of the hands are also a valuable source of information – mostly for guessing the final angles of the chest bone. The reader is welcome to exercise a little in between those lines and move his/her hands left or right while holding the head still. Notice how the spine twists along with the chest following the hands. The same goes for moving one hand up and the other down. While all that can be done with the chest held still, it is considerably more comfortable to relax the spine and let it bend, therefore the solution that we should be looking for. Considering that, the HMD will play the lead role in spine calculations, but the hand controllers will have an equally important duty of modifying chest rotation around its vertical and forward axes, based on their horizontal positions on the XZ plane and heights respectively.
Step 2 – Locomotion
Locomotion is the most complex problem for the solver to deal with. With no information about the lower body pose, it needs to be reactive, responsive, appear natural and not too robotic (unless the avatar is a robot of course). It is easy to end up looking like a marionette being dragged around by its head. The initial solution for Dead and Buried was a classic 8-directional strafing animation controller. Based on the horizontal distance of the head anchor from the avatar’s head, a stepping animation was played when it exceeded a certain threshold. A similar setup was used for turning, using the angle between the forward axis of the HMD and the forward axis of the avatar’s root transform. However, that solution proved to be too slow and inaccurate for a fast-paced shooting game like Dead and Buried where players would quickly jump in and out of cover. Also, the turning and stepping blend trees were conflicting, as there was no good solution for turning and moving at the same time. So we decided to go for a fully procedural locomotion instead to gain maximum control over the feet.
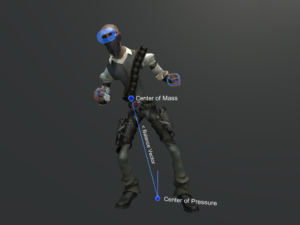
The locomotion solver works on the principle of footsteps. The feet are planted to the footsteps and will not budge unless a step is triggered. Calculating when and where to step and with which foot is the biggest challenge here. As real humans make side-steps in order to maintain balance, so will the solver. With the feet planted to the footsteps, hands to the hand controllers and spine bending already calculated, we have a fairly good approximation of the center of mass (CoM) and the center of pressure (CoP) for the avatar. The latter lies more or less halfway from the left foot to the right, the former is probably fastest approximated by getting the centroid of the triangle formed by the HMD and the hand controller positions.
We need to convert the loss of ability to maintain balance into a scalar value that could be used to trigger footsteps. That scalar value can be very cost-efficiently described as the angle between the inverse gravity vector and the vector from CoP to CoM. The greater the angle, the less balanced the character would appear, so a footstep will be triggered once the angle passes a certain threshold and the direction for that footstep would be that same balance vector orthogonally projected onto the ground plane. Similarly for turning on spot, an angular threshold is employed. It is also important to check and make sure that the stepping foot would not cross the other foot and get the legs tangled. Procedural locomotion also provides us with a chance to check for any obstacles like walls and objects by ray-casting from the current footstep to the next. Checking all those conditions before making a step is important for achieving a good looking, logical and meaningful locomotion.
It is not healthy though to lean sideways and start making a step only after having hopelessly lost balance. Normally people raise one of their feet immediately as they start moving. Unfortunately we do not have the luxury of knowing whether an acceleration of the HMD means the player just moved his/her head to peek out from cover or started going somewhere, so we can not start stepping based on that information alone. We can however use the velocity of the headset and the hand controllers as a predictive measure and decrease the balance angle threshold based on magnitude of velocity to achieve a more responsive solution for locomotion.
Step 3 – Legs
As the solver has already dealt with the spine and locomotion, it is time to plant the feet to the footsteps. The easiest way to do leg IK is to use a simple 3-joint trigonometric solver based on the Law of Cosines, that is as fast as any IK can ever be and always a perfectly accurate analytic solution. The main problem with such a solver in this case is that it can only handle 3 joints and that it will end with the ankle bone. Anchoring ankles to the footsteps is not the best solution for VR as it takes away the liberty for the avatar to rise up on its toes, also decreasing the range of motion for the headset before having to take a side-step to compensate for the static ankle. That is why VRIK employs a dual-pass trigonometric solver (one solving the knee joint, the other the ankle) that anchors not the ankle but the toes to the footsteps.
Having solved the legs, we might find that the head is too high for the feet to even reach the ground. A decision has to be made whether to let the feet float or plant them and have the head drift instead. In my experience, it is best to plant the feet, as them floating around would look worse for the third person than inaccuracies with the head that would hardly be noticed at all. Therefore, the solver will simply move the spine so that the hips would be positioned in a way that allows both toes to reach their targets.
Step 4 – Arms
Similar to leg IK, the arms can also be solved using a simple trigonometric solver. The biggest challenge here is not actually solving the upper arm, forearm and hand, but the shoulders. Rotating the shoulder bones directly towards the hand target will not support the wide range of motion of human arms. For instance, grabbing a weapon from the right shoulder with the left hand would have the shoulder flip backwards at some point. As the solver knows by now the position and orientation of the chest bone, it can use it as the local space in which to do all the calculations for the arms. VRIK uses a set of specific rules and angle offsets to deal with the shoulders, also clamping their rotation to make sure they stayed within a valid range.
Having no information about the elbows, the solver again has to try to guess the normal of the bend plane for the arms. It has 3 sources of information to base that quess upon: the world space position and rotation of the hand controller and the position of the hand controller relative to the chest bone. The hand bone can be rotated without moving the elbow at all so again, that guess can never be conclusive, but only provide us with a natural looking and relaxed solution. VRIK uses an empirically found mixture of those 3 information sources to compose a vector defining the bend plane for the arm and it has proved to be able to perform most gestures in a good looking way.
Summary
In contrast to most full body IK solvers heuristic by nature, VRIK – the IK used in Dead and Buried – is more like a collection of analytic and heuristic solvers. That design allows to insert custom rules and procedures required by the specifics of VR development at every step, rather than being constrained by the nature and limitations of an algorithm. In terms of performance, it will probably outperform other full body solvers as it has outperformed Full Body Biped IK (a component in Final-IK) with a win of at least 2-3 times.
As per publishing this paper, VRIK was in its final phase of testing within Dead and Buried and will shortly be available on the Unity Asset Store as another solver in the Final-IK package. Further work will be invested into the solver to investigate additional features such as internal collision avoidance, stretch and squash, eye motion and joint limits.
The Author
In addition to being the IK Specialist on the Dead and Buried team, Pärtel Lang is an independent developer dedicated to the research of character animation systems and the founder of RootMotion, a small company based in Tartu, Estonia.
RootMotion develops animation tools for the Unity platform. Final-IK, a complete inverse kinematics solution for Unity, has been available in the Asset Store since 2014 and PuppetMaster, an advanced character physics tool, since the end of 2015. Special thanks to Andrew Welch, Ryan Rutherford and Fabio Brasiliense for being a major help with the development and testing of VRIK!


